

Build your first plan
A 10-minute lesson. Follow one fixed path through the New plan wizard and finish with a plan for the next three months that runs in your own account.
In this lesson you build one Media Forecaster plan from start to finish. You make one fixed set of choices, in order, and you learn what each choice does. At the end, a plan for the next three months runs in your account.
The lesson uses one fixed path. For the full set of options at each step, see Create and run a plan after the lesson.
What you need
Section titled “What you need”- A Prescient AI account with one or more active models. Without an active model, the Goal step has no goals to select.
- Two or more channels that had spend in the same period one year ago. If your account is newer than that, Part 2 tells you what to select instead.
- About 10 minutes.
The plan that you build is real. The plan is private, so only you can see it, and you can delete it after the lesson.
Start the plan
Section titled “Start the plan”-
Select Media Forecaster in the Marketing group of the sidebar.
-
Select New plan.
The wizard opens. A rail on the left lists five steps: Timeline, Goal, Budget, Media, and Review & run. You are on the first step.
Part 1: Set the timeline
Section titled “Part 1: Set the timeline”The Timeline step answers one question: which period does the plan cover? You also select the period that the plan starts from.
-
Look at Models. Do not change the selection.
Media Forecaster selects a default model for each channel. These models forecast the plan.
-
In Reference period, select Same time last year.
The dates below the options change to the same days one year ago. The reference period sets the current spend of each row of the plan, and the same period of last year had the same season.
-
In Planning period, select 90 days.
The bar on the timeline grows to cover the period. A line below the two cards now says that the plan uses Forecast mode. You look at this again in the next part.
-
Select Continue.
Part 2: Choose the goal
Section titled “Part 2: Choose the goal”The Goal step answers a second question: what must the plan reach? In this lesson, the plan must reach a target.
-
Find the goal family Hit a target. Select the first goal card in the family.
The name of your card depends on your models. A field for the target appears below the cards.
-
Look at the target. Do not change the target.
Media Forecaster suggests a target that is 10% better than the forecast with no changes. The target is the total for the full planning period. The target is not growth on top of the current figure.
-
In Plan type, select Optimization.
A note appears below the control. The note says that your planning period is long for Optimization and that Forecast fits better. The note ends with a Switch link. Do not select Switch. For the difference between the two plan types, see How Media Forecaster builds a plan.
-
Select Forecast again.
The note goes away. Forecast is the plan type that fits a period of this length.
-
Select Continue.
Part 3: Set the budget
Section titled “Part 3: Set the budget”The Budget step sets the most that the plan can spend, and how far the plan can move each row.
-
Look at the two options at the top of the step. Leave Set a ceiling selected.
With Set a ceiling, you set the most that the plan can spend.
-
Look at Max budget.
The amount starts at the spend of your reference period, scaled to the length of your planning period. The line below the field shows this calculation.
-
Move the Adjust slider to the right until the field beside the slider shows 20, or type 20 in that field.
The slider has no numbers at its ends. The field beside the slider shows the percentage. Max budget goes up by 20%. With a target goal, the plan spends less than the maximum if the target needs less.
-
In Spend flexibility, select High.
The band below the options grows. With High, each row can go from zero to two times its baseline, which gives the plan more room to reach the target.
-
Select Continue.
Part 4: Choose the media
Section titled “Part 4: Choose the media”The Media step lists where the plan can invest. Because this is a Forecast plan, the table lists channels and their tactics. An Optimization plan lists campaigns too.
-
Clear the checkbox of the last channel row, which is the row above Total.
The summary line above the table now counts one channel less, and the Total row gets smaller. The plan cannot invest in a row that you clear.
The maximum budget of the plan also gets smaller. The budget follows the reference spend of the rows that are in the plan, and keeps the 20% that you added. You see the new amount in Part 5.
If the table has one channel row only, do not clear the row. A plan needs one channel or more, and the step shows Select at least one channel to include in the plan.
-
In the Allocation column of the first row, open the menu and select Max spend.
A limit editor opens below the cell. The editor has a field for the limit, a control that changes the field between an amount and a percentage, and a slider that goes from −100% to +100%. With Max spend, the plan still optimizes the row, but never above the limit.
-
Open the same menu again and select Optimize.
The limit goes away. With Optimize, your models decide the spend of the row. For a first plan, leave each row on Optimize.
-
Select Review.
Part 5: Review and run the plan
Section titled “Part 5: Review and run the plan”The Review & run step shows what the plan will do before you run it.
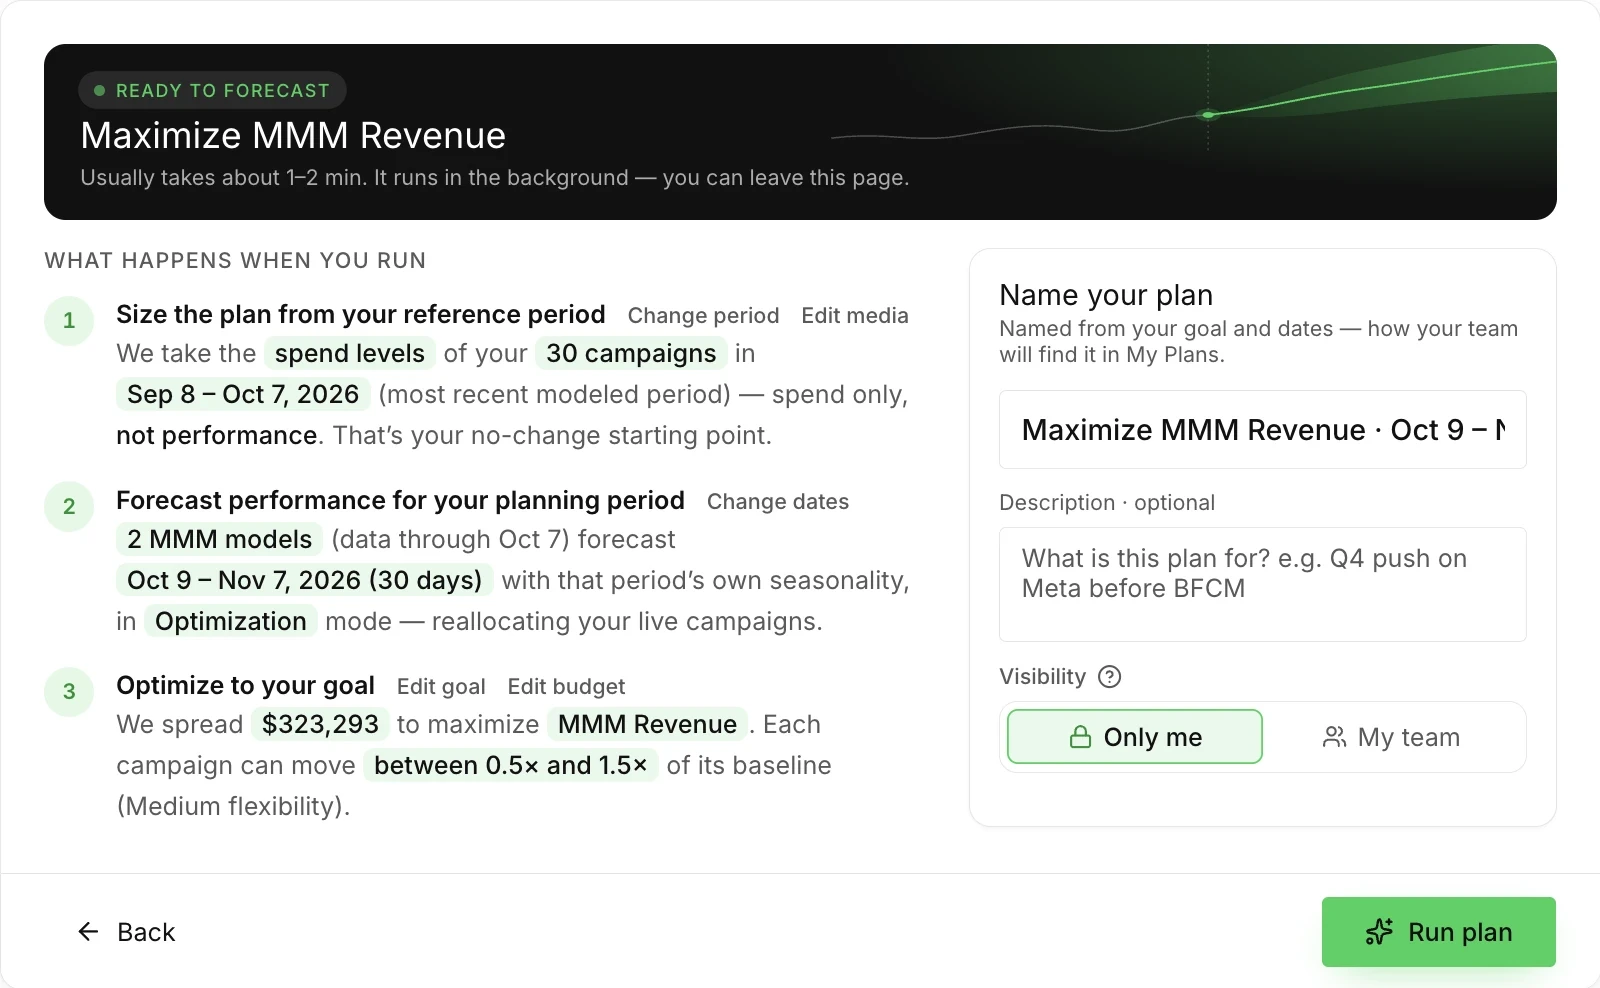
The picture shows where each part of the step is. The picture is from a different plan, so the goal, the dates, the plan type, and the amounts in the picture are not the ones of this lesson. Your screen shows your own goal, your own dates, and Forecast in the second stage.
-
Check the status at the top of the step.
Ready to forecast means that the plan can run. The headline below the status states the goal of the plan with your target.
-
Read the three stages under What happens when you run.
The stages repeat your choices in plain words: the reference period, the planning period with the plan type, and the goal with the maximum budget and the flexibility. The first stage counts campaigns, not channels, because each channel that you kept holds one or more campaigns. The maximum budget in the third stage is lower than the amount that you saw in Part 3, because you cleared a row in Part 4.
-
Look at Name your plan and Visibility. Do not change them.
Media Forecaster names the plan from the goal and the dates. Visibility is Only me, so the plan is private.
-
Select Run plan.
A message says Plan created successfully!
To leave without creating a plan, do not select Run plan. Select Cancel and discard at the bottom of the rail on the left. The wizard closes at once and keeps nothing.
What happens next
Section titled “What happens next”The plan is queued and runs in the background. The plan page shows the elapsed time and an estimate of the duration. You can leave the page. When the status of the plan in your plans list is Ready, open the plan to see the results.
If the plan fails, see Fix a failed plan.
What you did
Section titled “What you did”You built and ran a plan, and you saw what each step of the wizard decides.
- Timeline: the period that the plan covers, and the period that sets the current spend of each row.
- Goal: the one result that the plan must reach, and the plan type that fits the length of the period.
- Budget: the most that the plan can spend, and how far the plan can move each row.
- Media: the rows that the plan can invest in, and a limit on a row when you need one.
- Review & run: the full plan in plain words, before the run.
The plan of this lesson stays in your plans list. To delete the plan, see Manage plans.