

Connect a channel
How an Admin connects the data of a channel in Data Center, with the steps for each connection method and the checks that run on data that you supply.
To connect a channel, open the menu at the end of its row on the Channels tab and select Edit connection. A dialog opens with setup instructions on the left and the form for the connection method on the right. Follow the form for your method below.
You must be an Admin to connect a channel. The channel must be in the table first. See Add a channel.
How do you open the setup dialog?
Section titled “How do you open the setup dialog?”-
Open Data Center and stay on the Channels tab.
-
Find the channel. A channel that you have not connected has the status Not connected.
-
Select the menu at the end of the row, then select Edit connection.
The title of the dialog is Edit and the name of the channel. A line below the title names the integration that carries the data. Read the setup instructions in the dialog before you fill in the form. The instructions are specific to the channel.
Which form do you see?
Section titled “Which form do you see?”The form depends on the connection method of the channel. You see one of these forms.
-
Select Connect.
A hosted connect card opens. The card belongs to the service that carries the data, and the Powered by column names that service.
-
Sign in to the platform and approve access.
-
Finish the card. You return to Data Center.
For a channel that has a connection, the form shows Manage. See How do you manage a live connection. For a connection that needs attention, the form shows Reconnect.
-
Fill in each field that the form shows. Some channels have no field.
-
Select Connect with {Provider}. The button has the name of the provider.
-
Sign in at the provider and approve access. You return to Data Center.
For a live connection, the button reads Reconnect with {Provider}. For a connection that lost its authorization, the button reads Reauthorize with {Provider}.
-
Share the sheet as the setup instructions in the dialog tell you.
-
In the sheet, make a named range that covers your data, with the header row.
-
Paste the address of the sheet in Google Sheet URL.
-
Select Find ranges.
-
Select the range in Named range.
-
Select Connect.
Three checks then run on your data. See What are the checks. For a channel with a live connection, the button reads Update sheet.
BigQuery, Snowflake, SFTP, and Azure Blob Storage use one shared credential for your workspace. An Admin enters the credential one time on the Integrations tab. See Set up shared credentials.
If the integration has no credential yet, the form asks you to connect it first and shows a button such as Connect BigQuery. After the credential is connected, give the location of the data of this channel.
-
Open the setup dialog of the channel.
-
Fill in the location fields. The table below lists the fields of each integration.
-
If your workspace has two or more connected accounts, select the account in Credential.
-
Select the button of the form: Save dataset for BigQuery, Save table for Snowflake, or Save base path for SFTP and Azure Blob Storage.
Three checks then run on your data. When the channel already has a location, the button reads Update dataset, Update table, or Update base path.
A Snowflake data share has no shared credential. You give the share in the setup dialog of the channel.
-
Follow the setup instructions in the dialog.
-
Fill in Account identifier, Share name, Schema, and Table.
-
Select Connect.
Data Center shows Share connected. To change the values later, open the dialog again and select Update share.
-
Fill in each field that the form shows. The fields depend on the source, and the setup instructions say where to find each value.
-
Select Connect.
To change the credential later, open the dialog again and select Update credentials. A secret field that you leave blank keeps its stored value.
Some sources need no credentials from you. The dialog then says that your Prescient team will finish the setup.
Fields for one channel of a shared credential
Section titled “Fields for one channel of a shared credential”| Field | Integration | What to enter |
|---|---|---|
| Dataset ID | BigQuery | The dataset that holds the table of this channel. |
| Table ID | BigQuery | The table of this channel. |
| Database | Snowflake | The database of this channel. |
| Schema | Snowflake | The schema of this channel. |
| Table | Snowflake | The table of this channel. |
| Base path | SFTP and Azure Blob Storage | The path that holds the files of this channel. |
| Credential | Each shared credential | Shows when your workspace has two or more connected accounts. Select the account that this channel uses. |
What are the checks on data that you supply?
Section titled “What are the checks on data that you supply?”When you supply the data from Google Sheets, a warehouse, or a file location, Data Center runs three checks before the channel is connected.
| Step | What it checks |
|---|---|
| Reading your data… | Prescient reads the data. The step then reads Read your data. |
| Matching columns… | Prescient matches your columns to the columns that the category needs. The step then reads Columns matched. |
| Checking uniqueness & quality… | Prescient checks for duplicate rows and for values that it cannot use. The step then reads Data looks good. |
When each check passes, the dialog shows Channel validated and the channel is connected. Select Done.
What if a check does not pass?
Section titled “What if a check does not pass?”- Your columns have different names. The dialog shows a mapping form. For each required field, select the column of your data that holds it, then select Validate with this mapping. The form fills in its best guess.
- The data has a problem. The dialog lists each problem: a value of the wrong type, a blank value in a required column, a duplicate row, or a number with a currency symbol. Correct the source, then select Re-validate.
- The source is empty. Add data, then validate again.
- The dialog shows Saved, but not connected. Your details are saved, but Data Center has no column check for this type of channel from this source, so the channel is not connected. The dialog gives the reason.
For the columns that each type of channel needs, see Data requirements.
For the steps in the account of a specific platform, such as how to make a service account or how to share a dataset, see the setup dialog of the channel. The earlier help center also has a page for each platform. For the columns of data that you supply, use Data requirements, not the earlier pages. If an earlier page and the setup dialog differ, follow the dialog.
How do you manage a live connection?
Section titled “How do you manage a live connection?”A channel that a hosted connect card carries has a Manage menu in its setup dialog after you connect it. Only an Admin can use the items.
The capture shows the Edit dialog of a channel with the Manage menu open.
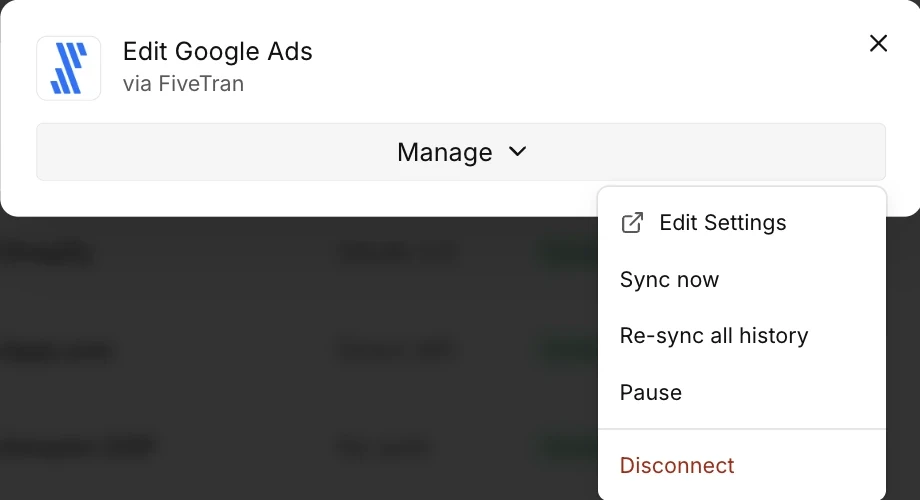
| Item | What it does |
|---|---|
| Edit Settings | Opens the hosted connect card again, so that you can change the sign-in or the accounts that sync. |
| Sync now | Starts a sync. Data Center shows Sync started, and the status changes to Syncing. |
| Re-sync all history | Reads the full history of the channel again. Data Center shows Historical resync started, and the status changes to Backfilling. |
| Pause | Stops the syncs of the channel until you resume them. Data Center shows Connection paused, and the status changes to Paused. The item shows for a channel that is not paused. |
| Resume | Starts the syncs of a paused channel again. Data Center shows Connection resumed, and the status changes to Connected. The item shows only for a paused channel. |
| Disconnect | The browser asks you to confirm. The action then deletes the connection at the service that carries the data. Data that is already synced is kept, and syncing stops. Data Center shows Disconnected. The channel stays in your list with the status Not connected, and you can connect it again. |
A paused channel has the status Paused and does not sync. To start the syncs again, open Edit connection, select Manage, then select Resume.
Disconnect keeps the channel in your list. To take the channel out of your list, see Remove a channel.
How do you send the setup to a colleague?
Section titled “How do you send the setup to a colleague?”If a different person holds the login for a platform, send that person a link to the setup dialog. In the menu of the channel row, select Copy setup link, then send the link. The person must be an Admin of your workspace to connect the channel.